
My approach to digital archiving and digitization was born more organically than the ways described in most writing I have seen on the topic. The steps outlined in this chapter were developed through trial and error after years of seeking out answers to patron questions. The public library I work for offers our patrons access to digitization equipment, and my job, in large part, has been figuring out how to guide our patrons through the processes that come with using it. After mastering the ins and outs of the equipment, the next questions asked by patrons are often, “How do I organize my photos? How do I back up everything? Where do I even start?”
Inspired by a 2017 Computers in Libraries article by staff at the Athens-Clarke County Library’s Digital Media Center (Stanley and Wright 2017), I developed a series of classes that are taught in the following order:
While we don’t have enough room in this chapter to dive into all of this content, at the end I have included some resources that were helpful when developing these programs. In this chapter, I explore the following topics:
When talking about digital archiving, I like to answer the questions Why, What, Where, and How.
Why are we talking about digital archiving? Everyone has different motivations for organizing their digital files. Most of my library patrons want to preserve their family and personal history. They want to ensure their family photos, home videos, and genealogy documents are shared with loved ones and available to future generations.
Technology has changed the way in which we store information. Most people no longer print out photos, cut them up, and paste them into scrapbooks (thank goodness). With new technologies introduced into the mix, people have to adapt how they store and share information.
Unlike physical files of photos that can be pulled out of boxes and put back in, digital files can be much more difficult to sort without good archiving practices. No one wants to lose their files. If you can’t find a file, it functionally does not exist. When talking about digital archiving practices, there are two main ways you can ensure long-term access to your digital files:
What are we saving? When I refer to digital files, I generally mean the following types of documents:
When talking to library patrons, I make sure to discuss file extensions. File extensions are an important part of file naming. It is good practice when working with patrons to never assume the base level of knowledge regarding file types. I have found that walking through the file types before diving into naming schemas can help patrons feel more comfortable looking at file names.
Where are we saving our files? Storage locations can be broken down into three major types:
Most users employ a combination of two of these, if not all three. One thing all these storage locations have in common is that they all have an expiration date, functionally speaking.
In general, the life of storage media is cut short by at least three factors: (1) use and handling, (2) lack of durability, and (3) obsolescence. Obsolescence is the most frustrating of the factors to work with in a digitization lab. When suggesting storage locations, I always lead customers away from storing files on DVDs, CDs, and floppy disks (yes, someone tried it last year).
Lest you think all problems are solved by cloud storage, there are a few things to keep in mind with cloud storage services:
So where do you store your digital files? I always recommend the 3-2-1 Method. The 3-2-1 Method calls for you to save three copies of your digital files with two of your copies stored locally (on different devices) and one copy stored off-site (on an online cloud service).
The best example I saw of this method in action was a library patron who frequents my lab. She and her husband back up their files to two external hard drives. One hard drive is hooked up to her computer, where it is updated daily. The other hard drive is stored in a fireproof safe and is switched out with the first hard drive monthly. She also uses a backup service on her computer that backs up files and information automatically with a third-party company.
While not everyone has the means or the discipline to follow such a strict regimen, even backing up one copy of your files will ensure they are available in the event something happens to your laptop or computer. Do your future self a favor and back up your files before disaster strikes.
However you decide to do it, make sure you back up your files regularly. For some people, this is done by setting up a monthly reminder. I tend to back up files after finishing a large sprint of work.
How do we name files? How do we store information about files? How do we find the files we need? How do we organize files? The How questions are some of my favorite to talk about with library patrons. Some questions are straightforward. Some are harder to answer.
Unfortunately, there is no easy answer when it comes to naming files. File naming is as personal as the files we store. There are experts who work to answer this question for institutions with large collections. For the most part, public library users are working on personal collections. For them I offer a few tips and a few examples of naming schemas I like.
A few naming schema examples are as follows:
yyyymmdd_location_subject_uniquenumbers.ext
surname-firstname_yyyymmdd_state-place_item.ext
name_date_place_item.ext
yyyy = year, mm = month, dd = date with 0 in front of single digit dates
Organizing your dates this way makes your pictures easier to sort by date.
For example, some friends and I took a trip together to New England. We started our journey in Boston. The first image I have is of Great Bay, and it was taken on November 22, 2016.
Using the yyyymmdd_location_subject_uniquenumbers.ext schema, I get the following file name:
Date: 20161122
Add: location—Boston
Add: subject of image (abbreviate)—grtbay (Great Bay)
Add: unique numbers (3 digits is enough for this particular trip)—001, 002, etc.
Add: filetype extension—.jpg, .tiff, etc.
Ex: 20161122_boston_grtbay_001.jpg
On a Mac, you can rename files in batch quickly (see figure 5.1). Select the images you want to rename, right-click, and select Rename # items. At the next step, you can choose to customize your file name and select where you want the numbering to begin.
On a Windows computer, you can select the items you want to rename, right-click, and simply type in the text you want to start with (see figure 5.2, p. 26). Windows does not allow for much customization in numbering with its batch renaming feature.
If you want more customization of your files when renaming in batch, consider using a file renamer. I usually recommend Advanced Renamer. It is open source and allows you to make your batch renaming as granular as you want.
Advanced Renamer
https://www.advancedrenamer.com
The short answer to how we store information about files is metadata! Introducing library patrons to metadata is a little bit like showing a peek behind the curtain of a good magic trick. Because we can’t add every single piece of information to a file name, we have to look to other ways of storing data about our digital files.
Metadata is a set of data that describes and gives information about other data. One good way to illustrate how metadata works is to talk about your library collection’s catalog. Every item at the library has (hopefully) a digital catalog entry. In this entry, information is stored about the author, publisher, and publication date. We also generally tag catalog entries with things like subject headings and a description. Digital files also have cards of information attached to them. The trick is knowing where to look and how to add information.
To see what information is attached to your digital file, right-click on the image you want to look into. On a Windows computer, you will see Properties (see figure 5.3, p. 26). On a Mac computer, you will see Get Info (see figure 5.4, p. 27).
When you get into the properties (see figures 5.5 and 5.6, p. 28), you can see some information about your digital file. On a photo you can see the following information:
Once you are in the Properties (Windows) or Info (Mac), you can add tags and comments to your file. If you are dealing with family photographs, you can add a tag for each person in the photograph. You can tag keywords like funeral, reunion, or lake house.
Once that information is saved in the files, you can search your computer by the tags you create. This process may seem like a lot of work to library patrons. But if they take this very important step with their digital files, they can save themselves a lot of work in the future. This is also a good way to share information with future family archivists. It’s a bit different from the old style of adding a caption to the back of the photograph and much more effective in the long run.
There is no perfect answer to how we organize files, and most people have elaborate file organization that makes sense only to them. But I have found that if you tag and name your files properly, you don’t need to organize them! The search function will get you all the places you want to go.
Earlier I stated that obsolescence is the most frustrating factor in potential loss of your files. Digitization can be a frustrating and time-consuming project for many library users (and staff).
There is a growing movement to “bring preservation to the people” (Memory Lab Network 2019). Public libraries are at the forefront of that movement. A public library is a democratic space that provides vital resources for its patrons. It is the great equalizer in a community.
At my library, we have a digitization lab where users can come use our equipment to digitize their analog memories. We have three scanners (capable of also scanning negatives and slides), a large-format scanner, a VHS converter, cassette converter, 8 mm and Super8 reel converter, LP converter, floppy disk drive, and a VHS-C adapter. This equipment was not cheap. However, providing it at the library and making it a shared resource for my county’s residents makes it accessible for anyone who wants to use it.
If you are interested in providing publicly accessible digitization equipment at your library, check out some spaces that already have a setup:
Memory Lab, DC Public Library
https://www.dclibrary.org/labs/memorylab
Digital Literacy Lab, Tulsa City-County Library
https://www.tulsalibrary.org/programs-and-services/aep-foundation-digital-literacy-lab
San José Public Library
https://www.sjpl.org/blog/retro-tech-analog-past-digital-future
For an extensive list of digitization labs in North America, check out the Memory Lab Network. The Memory Lab Network site has great resources for learning more about setting up a digitization lab. Some libraries offer more mobile digitization options on carts or even just add equipment to existing computers. A separate space is not necessary to start providing access to digitization equipment.
Memory Lab Network
http://libguides.dclibrary.org/memorylab/resources/digi-stations
When talking about best practices in digitization with library users, it is important to understand your patrons’ motivations and available resources. They often do not have the time, patience, and available storage space to adhere to professional digitization standards.
If you are looking for information on resolution and digitization standards, check out the “Guidelines for Electronic Preservation of Visual Materials” by the Library of Congress.
Guidelines for Electronic Preservation of Visual Materials
https://www.loc.gov/preservation/resources/rt/guide/index.html
The hardest part of any digitization project is getting started. Here are a few steps your library patrons can take that will set them up for success.
There are two books that have been valuable re-sources for me when developing best practices and instruction:
Condron, Melody. 2017. Managing the Digital You: Where and How to Keep and Organize Your Digital Life. Lanham, MD: Rowman and Littlefield.
Memory Lab Network. 2019. Homepage. Accessed January 9, 2020. https://memorylabnetwork.github.io/index.html.
Stanley, Angela, and Natalie Wright. 2017. “Saving Stuff: Digital Preservation for Family Historians.” Computers in Libraries 37, no. 3 (April): 19–22.
* Katlin Seagraves works as a digital services coordinator at a public library in Tulsa, where she educates library patrons on digitization, digital archiving, online legacies, and digital estate planning. You can find her on Twitter @iamliterate, where she spends too much time talking about romance books.
Figure 5.1
A screenshot of the options you get in renaming Finder items on a Mac computer

Figure 5.2
A screenshot of items selected and renamed on a Windows computer
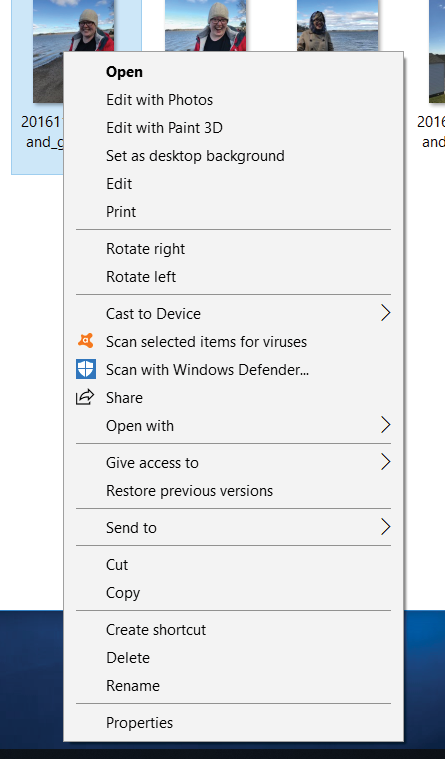
Figure 5.3
A screenshot of file options on a Windows computer

Figure 5.4
A screenshot of file options on a Mac computer

Figure 5.5
A screenshot of the Properties on a Windows computer

Figure 5.6
A screenshot of Info on a Mac computer